One of the most surprising discoveries from yesterday's deep dive into AI image and video enhancement tools is the accuracy and ease-of-use of modern facial restoration systems. These tools take a degraded image (such as a frame from a grainy, blurry, pixelated cellphone video), identify all of the human faces within, and use GAN models to reconstruct much higher resolution and sharper versions of the faces by hallucinating a possible human face that would yield that degraded version in much the way a human sketch artist might do. In our experiments to date, we've found GFPGAN to yield the best results by far for facial restoration, creating eerily uncanny photorealistic recreations that typically match the actual face down to the level of individual wrinkles and hair placement, though with tell-tale artifacts, including gridded hair placement.
The Real-ESRGAN upscaling toolkit is one of the most common ways of accessing GFPGAN and offers a Colab implementation to make it easy to experiment with its capabilities. In our case, to speed up the process, we installed locally on a GCE VM with a V100 GPU:
git clone https://github.com/xinntao/Real-ESRGAN.git
cd Real-ESRGAN
pip3 install basicsr
pip3 install facexlib
pip3 install gfpgan
pip3 install -r requirements.txt
python3 setup.py develop
Let's test it on this Twitter video of Polish President Andrzej Duda posing for the press with Ukrainian President Volodymyr Zelenskyy:
Since Real-ESRGAN only works on still images, we'll download the Twitter video and burst it into a sequence of still image frames:
apt-get -y install ffmpeg
python3 -m pip install -U yt-dlp
rm TWITTERVIDEO.mp4; yt-dlp -o TWITTERVIDEO.mp4 https://twitter.com/AndrzejDuda/status/1643599931687436289
mkdir FRAMES
time ffmpeg -nostdin -hide_banner -loglevel panic -i ./TWITTERVIDEO.mp4 -vf "scale=iw*sar:ih" "./FRAMES/%06d.jpg"
Now we'll apply Real-ESRGAN to enhance each frame, requesting 2x upscaling of the background and face restoration via GFPGAN:
mkdir FRAMES_ENHANCED
time python3 ./inference_realesrgan.py -n RealESRGAN_x4plus -i FRAMES -o FRAMES_ENHANCED --outscale 2 --face_enhance
Then we'll reassemble the frames into a video:
rm IMAGES.TXT; find FRAMES_ENHANCED/*.jpg | parallel -j 1 'echo "file {}" >> IMAGES.TXT'
time ffmpeg -f concat -i ./IMAGES.TXT -framerate 25 -vcodec libx264 -vf "pad=ceil(iw/2)*2:ceil(ih/2)*2" -y ./TWITTERVIDEO-ESRGAN-2x.mp4
And here is the Real-ESRGAN-restored version of the video. Note how the faces appear hyper-realistic, while the background actually loses a lot of detail and becomes almost painterly, with the wall painting being reduced to abstract impressionism. Despite Real-ESRGAN being deterministic, its subtle reactions to the very high block artifacting and blurriness of the original video creates noticeable interframe-jitter. Note how when the two leaders turn to face one another, their faces suddenly revert to the original video before "popping" back to their hyperrealistic versions when they turn back to the camera. This is due to GFPGAN's focus on forward-facing faces.
One fascinating aspect of the restored video is the way in which it renders their eyes in a hyperrealistic fashion such that it is immediately clear that they are scanning the crowd of photographers – something that is not immediately noticeable in the source video without carefully studying their eye region. Note also some of the hallucinated artifacts, including differential eye coloration for Zelenskyy in some frames and gold-rimmed glasses for Duda.
Given that Real-ESRGAN actually yields reduced quality in the overall image, the real value of the video above lies in the facial restoration performed by GFPGAN. Let's try using it directly.
First, we'll install GFPGAN:
git clone https://github.com/TencentARC/GFPGAN.git
cd GFPGAN
pip3 install basicsr
pip3 install facexlib
pip3 install -r requirements.txt
python3 setup.py develop
pip3 install realesrgan
wget https://github.com/TencentARC/GFPGAN/releases/download/v1.3.0/GFPGANv1.3.pth -P experiments/pretrained_models
Then we'll run it over the same frames as we did before:
mkdir FRAMES_ENHANCED
time python3 ./inference_gfpgan.py -i FRAMES -o FRAMES_ENHANCED -v 1.3 -s 2
This time we get several different output subdirectories: one containing the full restored version of each frame that uses Real-ESRGAN for the background and GFPGAN for the faces, identical to our workflow above. We can visualize this similar to how we did above:
rm IMAGES.TXT; find FRAMES_ENHANCED/restored_imgs/*.jpg | parallel -j 1 'echo "file {}" >> IMAGES.TXT'
time ffmpeg -f concat -i ./IMAGES.TXT -framerate 25 -vcodec libx264 -vf "pad=ceil(iw/2)*2:ceil(ih/2)*2" -y ./TWITTERVIDEO-GFPGAN-VID2x.mp4
The resulting video is nearly identical to the one above, though Real-ESRGAN's performance on the background is improved in some areas and degraded in others, compared to using Real-ESRGAN directly above.
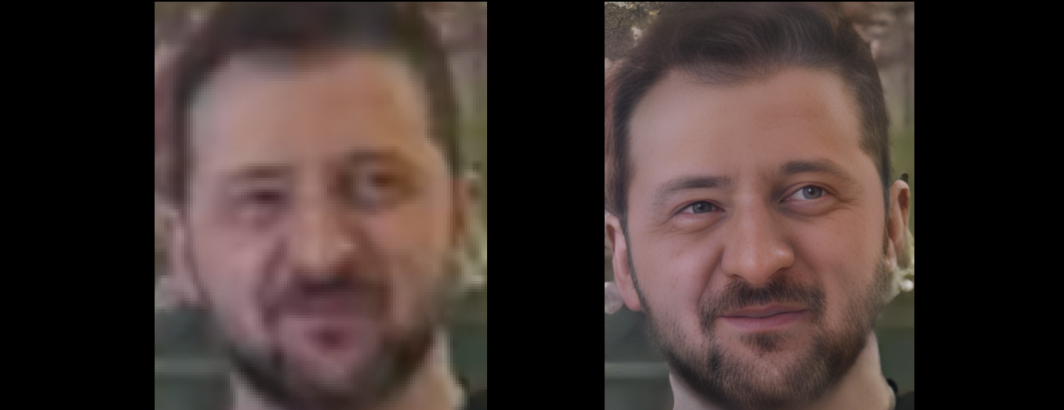
The real benefit of using GFPGAN directly, however, is its ability to extract the underlying faces individually and store them in a set of subdirectories, allowing downstream analyses to just use the GFPGAN-restored faces, rather than the Real-ESRGAN-upscaled background. There are three face-related subdirectories: "cropped_faces" that contains each face from each frame in the original video, "restored_faces" that contains the corresponding faces restored by GFPGAN and "cmp" that contains a special side-by-side comparison view of each extracted face and its restored version.
Let's visualize these:
time ffmpeg -pattern_type glob -i 'FRAMES_ENHANCED/cmp/*_00.png' -framerate 2 -vcodec libx264 -vf "pad=ceil(iw/2)*2:ceil(ih/2)*2" -y ./TWITTERVIDEO-GFPGAN-FACECMPS-00.mp4
time ffmpeg -pattern_type glob -i 'FRAMES_ENHANCED/cmp/*_01.png' -framerate 2 -vcodec libx264 -vf "pad=ceil(iw/2)*2:ceil(ih/2)*2" -y ./TWITTERVIDEO-GFPGAN-FACECMPS-01.mp4
Note that GFPGAN numbers the faces in the order it sees them in each frame. In the majority of cases, Face 0 corresponds to Zelenskyy and Face 1 to Duda, but you will see some exceptions in the videos below – this is purely due to the order it extracted them from those frames.
The best way to really examine these videos is to use the time slide at the bottom of each video and manually scroll through the frames to compare specific examples of poses, since this captures both the strength and weaknesses of the underlying model, including some of the hallucination artifacts, but also how well it reconstructs faces even from extremely poor-quality video with extreme compression artifacts.
Face 0:
Face 1:
As hyper-realistic as these results are, it is critical to remember that they represent an AI model's hallucination of a face that it believes could yield the original degraded face image under similar artifacting. The generated face is just one of myriad possible faces that could have yielded the original face and may exhibit extreme artifacts, from changes in facial structure to eye colorization or exaggerated facial features as seen in a number of Zelenskyy frames to the addition of facial hair or even glasses, as seen in some Duda frames above. In this way it is equivalent to a sketch artist asked to create one of many possible renderings of what the person might look like. At the same time, as the images above demonstrate quite clearly, in the general case, these images represent extremely accurate reconstructions of what the person actually looks like.
There are myriad ethical questions surrounding such generative-reconstructive tools and further research will be required to see if they perform as well on the full range of human faces from across the world, but the examples above crystalize the tremendous potential of such tools to restore poor-quality video.