Over the last two days we've demonstrated using Gemini 3 Pro and Nano Banana Pro to turn videos into infographics. The resulting infographic images are both visually beautiful and highly informative, but they are also static PNG images. While these static images are fantastic for printing and sharing online, from the moment they are created, they are disconnected from their source material, lacking citations and additional supporting evidence behind their claims. Could we turn these static images into interactive clickable HTML versions that can be viewed in any web browser that provide additional detail when each section is clicked? Incredibly, Gemini was able to not only turn our static infographics into clickable versions, it was able to go back through the original video and identify sections relevant to each clickable region and incorporate translated snippets into the clickable interactive infographic providing full provenance and citations for all of the key details in the image!
The end result is that the best results are found by breaking this into two tasks: asking Gemini to take the infographic and make an interactive clickable HTML version of it and then going back and providing it the MP4 file and asking it to watch the video and translate and incorporate translate snippets from the video into each clickable region. No data was used to train or tune any model.
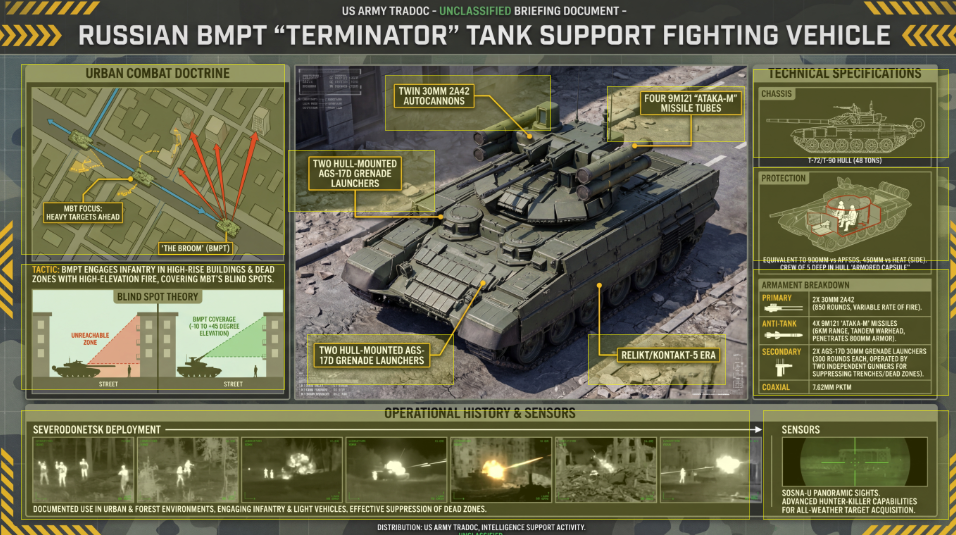
Let's start with one of the infographics we created earlier this week and just give Gemini 3 Pro the JPEG image and the following prompt. We're going to purposely not provide any guidance and just see what Gemini does:
Make this infographic into a clickable interactive graphic.
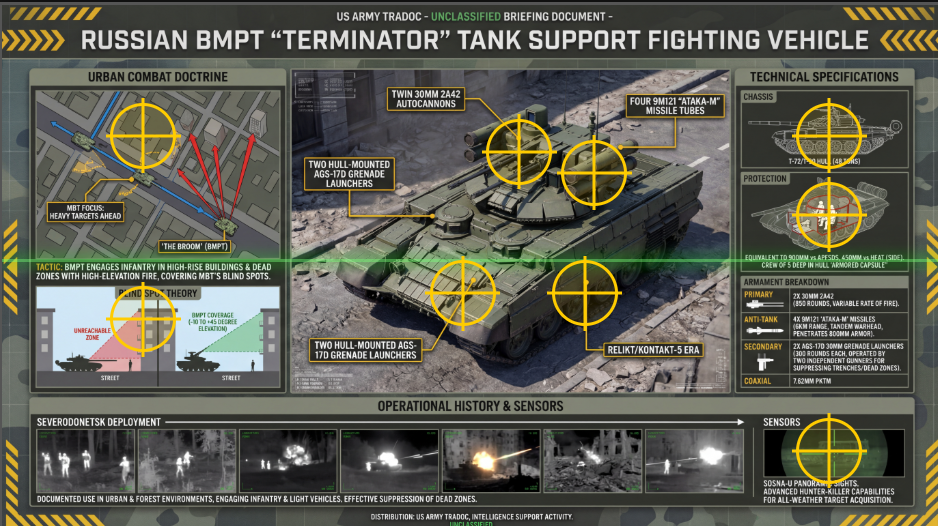
Click on the image below to see the results and open the interactive infographic version. Interestingly, Gemini chose to keep the military theme and use rifle scope images to identify the clickable areas. It does a good job of identifying most of the key clickable areas, though it does miss a few.
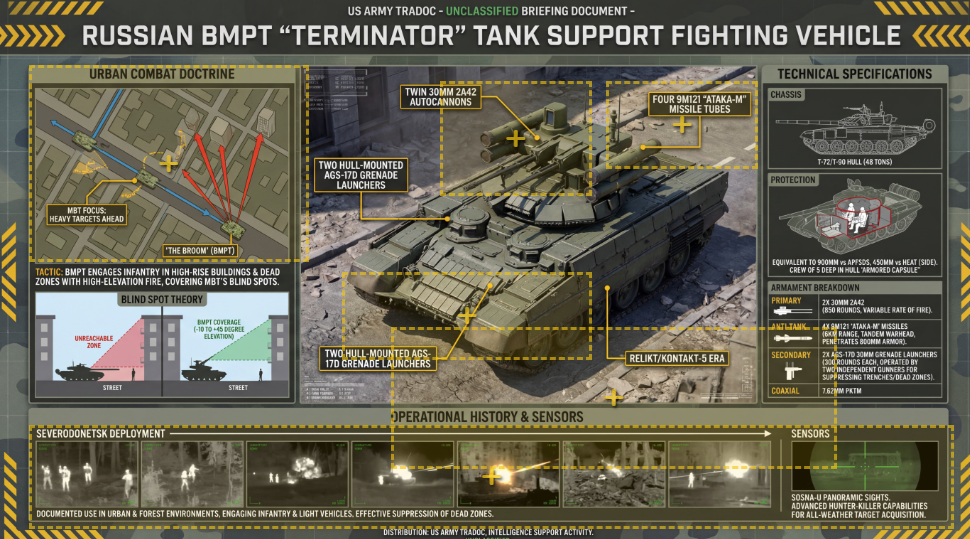
Since Gemini doesn't have access to the original source video, the most it can do is identify the key sections of the infographic and create an HTML template that makes them clickable. If we provided Gemini with the original source video, could it actually go back and provide citations and context to enrich the infographic? Let's try exactly that: we'll provide Gemini 3 Pro with both the MP4 video file and the infographic and ask it to include translated snippets from the transcript in the infographic. While this works, you can see that the bounding boxes are not ideal – they miss multiple key sections and are "off" for several of the ones it does catch:
Here is a video clip and an infographic that captures the core details of the video. Make an interactive clickable HTML version of this infographic that when you click on each section expands with additional detail and includes excerpts of the original video translated into English supporting that portion of the infographic and the timecode of each excerpt.
Click on the image below to open the interactive infographic version.
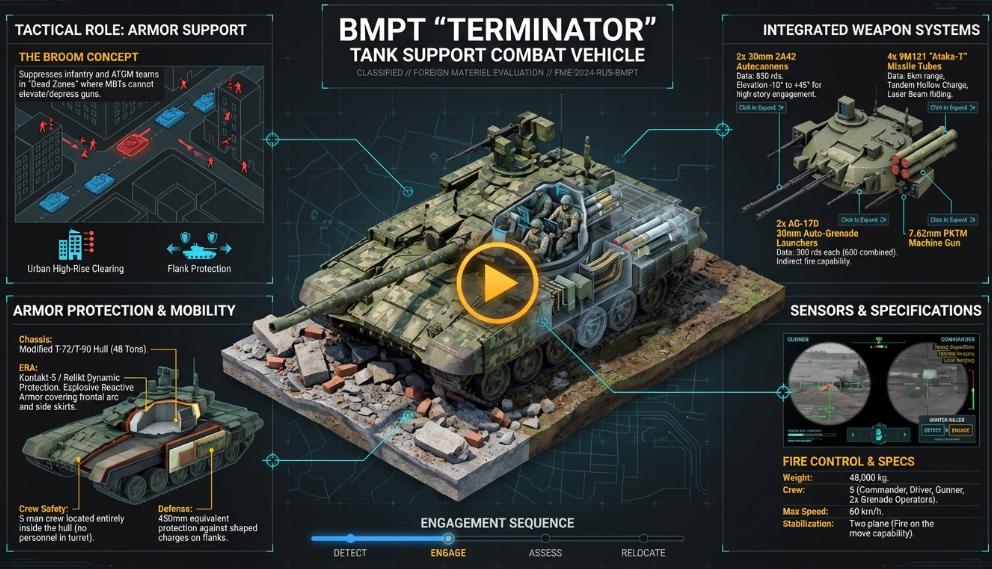
Let's try a different approach and try to make the interactive infographic from the start, instead of forcing Gemini to analyze a JPEG image out of context. Let's provide Gemini 3 Pro the original 6-minute MP4 video and the following modified prompt:
Make a prompt to visualize this as an interactive illustrated explainer poster in landscape orientation designed to be an interactive visually beautiful HTML page that narrates the attached video as a single large landscape orientation infographic that outlines all of the major themes and trends and findings. Focus on the combined story of the video. The HTML page should be entirely in English and in landscape orientation. The page should be a US military-style technical poster with full specifications and information for military planners. Emphasize that the poster captures all of the technical detail contained in the broadcast.
We then take the image generation prompt it yields and provide that to Nano Banana Pro. Unfortunately, despite the prompt instructing Nano Banana Pro to make an HTML page, it outputs only a static image as usual. We keep the same session and instruct Nano Banana Pro to make the HTML this time instead of Gemini 3 Pro:
Make a clickable interactive HTML page version of this image.
Nano Banana Pro returns an HTML page that does loads, but instead of creating a clickable layer on top of the infographic, it split the infographic into many small sub images and hallucinated that it had uploaded them all to the IMGUR image hosting site, yielding a page that doesn't load properly. Keeping the same session, let's ask it to fix that:
No, only use a single image for the page (https://storage.googleapis.com/data.gdeltproject.org/blog/2026-infographics/bmpt-infographicv3.jpg), but keep all of the clickable regions.
This time it returns HTML that displays the same page, but uses the single infographic as the background image and it loads. You can view the final interactive version by clicking on the image below. As before, the clickable zones aren't quite right: they are misaligned and missing for multiple sections.
While this worked, it seems like Gemini should be able to do much better. Let's change our approach. Instead of asking Gemini to make the image into a clickable infographic and incorporate context and details in a single pass, let's break it into two separate tasks to focus its attention.
First, we'll just upload the original infographic image and give it the following prompt to just make an HTML page with clickable regions over all of the key sections of the image. We'll give it the URL too so the HTML works from the start instead of us having to go back and edit with the real image URL.
Analyze the image carefully. Its URL is "https://storage.googleapis.com/data.gdeltproject.org/blog/2026-infographics/bmpt-infographic.jpg" Make an HTML page that makes all of the various sections of the infographic clickable with a faint yellow overlay. For each clickable section, have it display an overlay when clicked that contains the text of that section.
This returns an HTML page that this time has clickable regions over all of the key areas and nearly correct margins for all of them. In fact, this is actually the best clickable overlay we've seen in all our tests to date. Now, we go back and provide it the MP4 file and ask it to analyze the video and add that info to the clickable sections it has created.
That's perfect. Now go through the attached video and for each clickable area, find the sections of the video that relate to it and update the overlay text for that section to add English translations of the snippets from the video relating to that section along with the timestamp in the video where they appear.
Remarkably, we get the best results of all our tests (click the image below to view the interactive version), suggesting that the best results are to break this into two tasks.